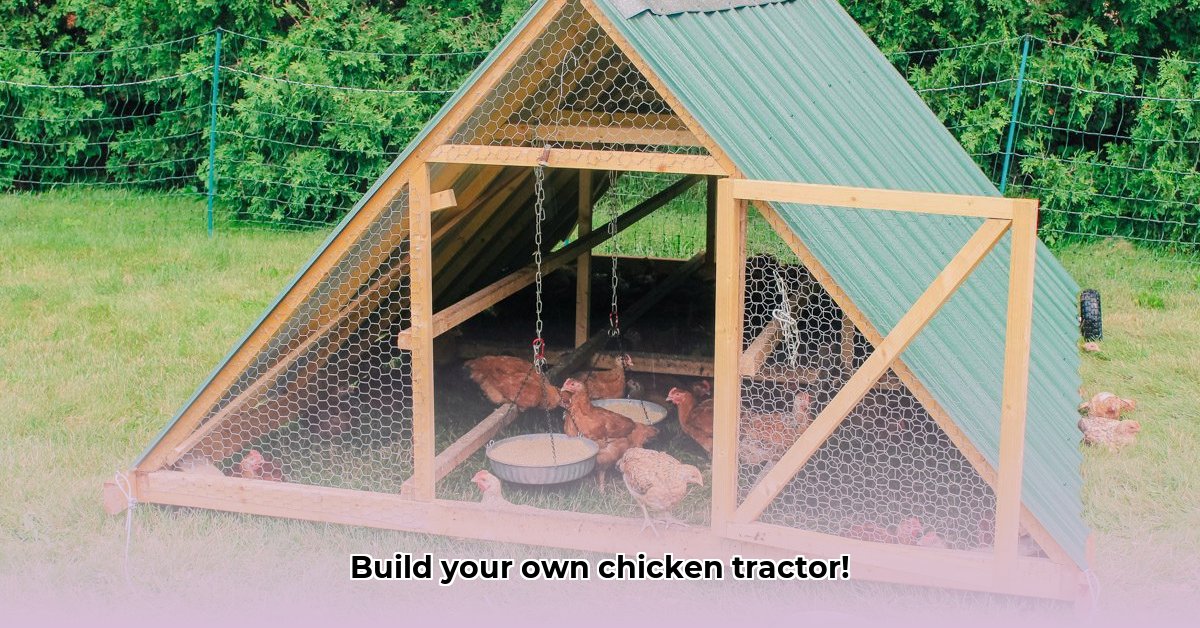
Ready to raise happy, healthy chickens and improve your land management? Building your own chicken tractor is a rewarding and surprisingly straightforward project! This complete guide will walk you through every step, from design to final touches, ensuring you build a safe, mobile coop even if you're a complete beginner. For even more detailed plans, check out this chicken tractor plan. Let's get started!
Designing Your Chicken Tractor: Size and Materials
Before you grab your tools, plan your tractor's size and materials. How many hens will you house? A general rule is 4 square feet (0.37 square meters) per chicken, giving each hen ample space. Consider the size and weight of your flock when selecting materials to ensure easy maneuverability.
What materials will you use? Recycled wood is cost-effective, however, carefully inspect it for strength and durability, ensuring it can withstand the elements and protect your birds. New lumber provides superior strength and longevity, minimizing maintenance over time. Remember, the chosen materials must balance protection and ease of movement.
Building Your Chicken Tractor: A Step-by-Step Guide
This section provides detailed, illustrated instructions. Remember safety first! Always wear safety glasses and work gloves.
1. Building the Foundation: The Frame
Construct a sturdy rectangular frame using pressure-treated 4x4 lumber (or equivalent). The exact dimensions depend on your flock size (remember that 4 sq ft/hen guideline!). Use galvanized screws or lag bolts (stronger than nails) to securely fasten the corners. This is the backbone of your tractor; make it strong! (Image: Frame construction with labeled dimensions in both inches and centimeters)
2. Enclosing Your Flock's Haven: Adding the Walls
Enclose the frame with hardware cloth (strong wire mesh) to protect your chickens from predators. Securely attach the mesh using staples or heavy-duty wire ties, ensuring no gaps exist. (Image: Hardware cloth installation with detail shot showing secure fastening)
3. Shielding from the Elements: Constructing the Roof
Build a simple gabled roof – this offers excellent weather protection. Use plywood or corrugated metal sheeting. Ensure the roof overhangs the walls to protect against rain. (Image: Simple gabled roof construction with dimensions)
4. Access and Freedom: Doors and the Chicken Run
Install one hinged door for easy access to the interior for cleaning and egg collection. A second smaller door is beneficial for easier cleaning. (Image: Door installation with close-up of secure hinges) Consider adding a movable run extension made of hardware cloth. This area provides foraging space. (Image: Movable Run Attachment)
5. Mobility Magic: Adding Wheels or Runners
Attach sturdy wheels or runners to the bottom of the frame for easy relocation. Wheels are ideal for smooth terrain; runners are better on uneven ground. (Image: Wheel/Runner attachment options)
6. Finishing Touches: The Comforts of Home
Add roosting bars inside for your hens. A nesting box (optional) facilitates easy egg collection. Ensure easy access for cleaning and maintenance. (Image: Interior with roosting bars and nesting box)
Material List: Gathering Your Supplies
This list provides example quantities. Adjust based on your tractor's dimensions.
| Material | Quantity (Example) | Metric Units | Imperial Units | Notes |
|---|---|---|---|---|
| Pressure-treated lumber | 10 | 2.4m | 8 ft | For the frame |
| Hardware cloth (wire mesh) | 1 roll | N/A | N/A | Walls and run; essential for predator protection |
| Plywood or Corrugated Metal | 2 sheets | 1.2m x 2.4m | 4'x8' | For the roof |
| Hinges | 2 | For access doors | ||
| Screws/Lag bolts | As needed | To securely fasten everything together | ||
| Wheels or Runners | 4 | Choose based on terrain; essential for movability | ||
| Staples/Wire ties | As needed | Secure the hardware cloth to the frame |
Predator Proofing: Keeping Your Chickens Safe
Predator protection is crucial! While hardware cloth forms the primary defense, consider burying at least 6 inches (15 cm) of the bottom mesh underground to deter digging predators. Use a secure latch on the door. Supplementary night-time covers for the run might be necessary.
Moving Your Chicken Tractor: A Healthy Pasture
Move your chicken tractor every 2-3 days to prevent overgrazing and allow natural fertilization of the soil. Adjust this timeframe based on pasture health and manure distribution. (Image: Chicken tractor in a pasture)
Troubleshooting: Solving Common Issues
- Tractor too heavy? Use lighter-weight materials.
- Predators getting in? Inspect for gaps; reinforce weak points; improve latch security.
- Run too small? Build an extension.
Key Takeaways:
- Building a chicken tractor is a cost-effective, sustainable way to raise chickens.
- Mobile coops improve pasture management and reduce the risk of parasite build-up.
- This project is achievable for most DIY enthusiasts with basic skills.
Building your chicken tractor is a rewarding experience providing a safe and enriching environment for your chickens, while simultaneously improving the health of your land! Happy building!